很久没使用mybaits,今天搭架了一个简单的mybaits项目,后面有源码,可以直接运行。
环境:centos6.5,mysql5.1.73,jdk8
1、先构建一个spring boot项目,可以直接官网构建,点击构建https://start.spring.io/
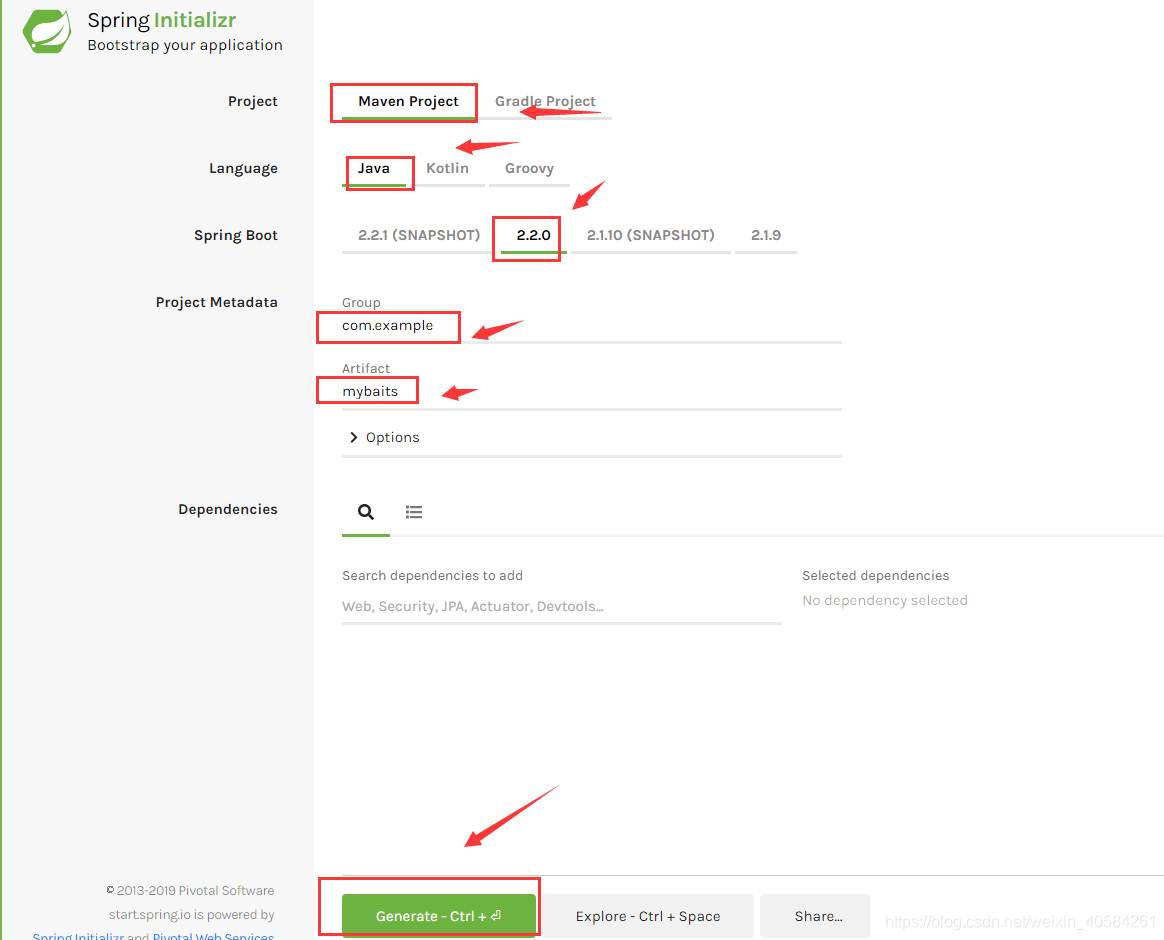
版本可以随便选择一个,后期可以修改。
2、引入mybaits的maven依赖,如下:
<?xml version="1.0" encoding="UTF-8"?>
<project xmlns="http://maven.apache.org/POM/4.0.0"
	xmlns:xsi="http://www.w3.org/2001/XMLSchema-instance"
	xsi:schemaLocation="http://maven.apache.org/POM/4.0.0 http://maven.apache.org/xsd/maven-4.0.0.xsd">
	<modelVersion>4.0.0</modelVersion>

	<artifactId>spring-boot-mybaits</artifactId>
	<packaging>jar</packaging>

	<properties>
		<project.build.sourceEncoding>UTF-8</project.build.sourceEncoding>
		<project.reporting.outputEncoding>UTF-8</project.reporting.outputEncoding>
		<java.version>1.8</java.version>
	</properties>

	<parent>
		<groupId>org.springframework.boot</groupId>
		<artifactId>spring-boot-starter-parent</artifactId>
		<version>2.0.0.RELEASE</version>
		<relativePath />
	</parent>

	<dependencies>
		<dependency>
			<groupId>org.springframework.boot</groupId>
			<artifactId>spring-boot-starter-web</artifactId>
		</dependency>
		<dependency>
			<groupId>org.springframework.boot</groupId>
			<artifactId>spring-boot-starter-jdbc</artifactId>
		</dependency>
		<dependency>
			<groupId>org.mybatis.spring.boot</groupId>
			<artifactId>mybatis-spring-boot-starter</artifactId>
			<version>2.0.0</version>
		</dependency>
		<dependency>
			<groupId>mysql</groupId>
			<artifactId>mysql-connector-java</artifactId>
		</dependency>
	</dependencies>

</project>
引入parent标签,指定parent版本,后面的都不需要指定了,会自动添加版本号。
3、配置application.yml文件
server:
  port: 8081  #spring boot启动端口
spring:
  datasource:
    username: root   #mysql用户名
    password: aaaaaa  #mysql密码
    url: jdbc:mysql://192.168.10.131:3306/test?useUnicode=true&characterEncoding=utf-8&useSSL=true&serverTimezone=UTC
    driver-class-name: com.mysql.jdbc.Driver
  main:
    allow-bean-definition-overriding: true
mybatis:
  mapper-locations: classpath:mapping/*Mapper.xml
  type-aliases-package: com.qianqiangongzi.entity
logging:
  level:
    com:
      qianqiangongzi:
        mapper: debug
4、分别构建类User、UserMapper、UserService、UserController
package com.qianqiangongzi.entity;

public class User {
	private int id; // id
	private String name; // 名字
	private int age; // 年龄

	public int getId() {
		return id;
	}

	public void setId(int id) {
		this.id = id;
	}

	public String getName() {
		return name;
	}

	public void setName(String name) {
		this.name = name;
	}

	public int getAge() {
		return age;
	}

	public void setAge(int age) {
		this.age = age;
	}

	@Override
	public String toString() {
		return "User [id=" + id + ", name=" + name + ", age=" + age + "]";
	}

}
package com.qianqiangongzi.mapper;

import java.util.List;

import org.springframework.stereotype.Repository;

import com.qianqiangongzi.entity.User;

@Repository
public interface UserMapper {
	/**
	 * 通过id查询用户信息
	 *
	 * @param id
	 * @return
	 */
	User findById(int id);

	/**
	 * 查询所有用户
	 *
	 * @return
	 */
	List<User> findAllUser();

	/**
	 * 插入数据
	 *
	 * @param id
	 * @param name
	 * @param age
	 */
	void insert(User user);

	/**
	 * 通过id修改name属性
	 *
	 * @param id
	 * @param name
	 */
	void update(int id, String name);

	/**
	 * 通过id删除数据
	 *
	 * @param id
	 */
	void deleteById(int id);
}
package com.qianqiangongzi.service;

import java.util.List;

import org.springframework.beans.factory.annotation.Autowired;
import org.springframework.stereotype.Service;

import com.qianqiangongzi.entity.User;
import com.qianqiangongzi.mapper.UserMapper;

@Service
public class UserService {
	@Autowired
	private UserMapper userMapper;

	public User findById(int id) {
		return userMapper.findById(id);
	}

	public List<User> findAllUser() {
		return userMapper.findAllUser();
	}

	public void insert(User user) {
		userMapper.insert(user);
	}

	public void update(int id, String name) {
		userMapper.update(id, name);
	}

	public void deleteById(int id) {
		userMapper.deleteById(id);
	}
}
package com.qianqiangongzi.controller;

import org.springframework.beans.factory.annotation.Autowired;
import org.springframework.web.bind.annotation.PathVariable;
import org.springframework.web.bind.annotation.RequestMapping;
import org.springframework.web.bind.annotation.RequestParam;
import org.springframework.web.bind.annotation.RestController;

import com.qianqiangongzi.entity.User;
import com.qianqiangongzi.service.UserService;

@RestController
@RequestMapping("/api/User")
public class UserController {
	@Autowired
	private UserService userService;

	@RequestMapping("getUser/{id}")
	public String getUser(@PathVariable int id) {
		return userService.findById(id).toString();
	}

	@RequestMapping("getAllUser")
	public String getAllUser() {
		return userService.findAllUser().toString();
	}

	@RequestMapping("insert")
	public String insert(User user) {
		userService.insert(user);
		return "插入成功";
	}

	@RequestMapping("update")
	public String update(@RequestParam int id, @RequestParam String name) {
		userService.update(id, name);
		return "修改成功";
	}

	@RequestMapping("deleteById")
	public String deleteById(@RequestParam int id) {
		userService.deleteById(id);
		return "删除成功";
	}
}
5、增加UserMapper.xml映射文件
<?xml version="1.0" encoding="UTF-8"?>
<!DOCTYPE mapper PUBLIC "-//mybatis.org//DTD Mapper 3.0//EN" "http://mybatis.org/dtd/mybatis-3-mapper.dtd">
<mapper namespace="com.qianqiangongzi.mapper.UserMapper">

	<resultMap id="BaseResultMap"
		type="com.qianqiangongzi.entity.User">
		<result column="id" jdbcType="INTEGER" property="id" />
		<result column="name" jdbcType="VARCHAR" property="name" />
		<result column="age" jdbcType="INTEGER" property="age" />
	</resultMap>

	<select id="findById"
		resultType="com.qianqiangongzi.entity.User">
		select * from user where id = #{id}
	</select>

	<select id="findAllUser"
		resultType="com.qianqiangongzi.entity.User">
		select * from user
	</select>

	<insert id="insert"
		parameterType="com.qianqiangongzi.entity.User">
		insert into user (id, name, age) values (#{id}, #{name},
		#{age})
	</insert>

	<update id="update">
		update user set name = #{arg1} where id = #{arg0}
	</update>

	<delete id="deleteById">
		delete from user where id = #{id}
	</delete>

</mapper>
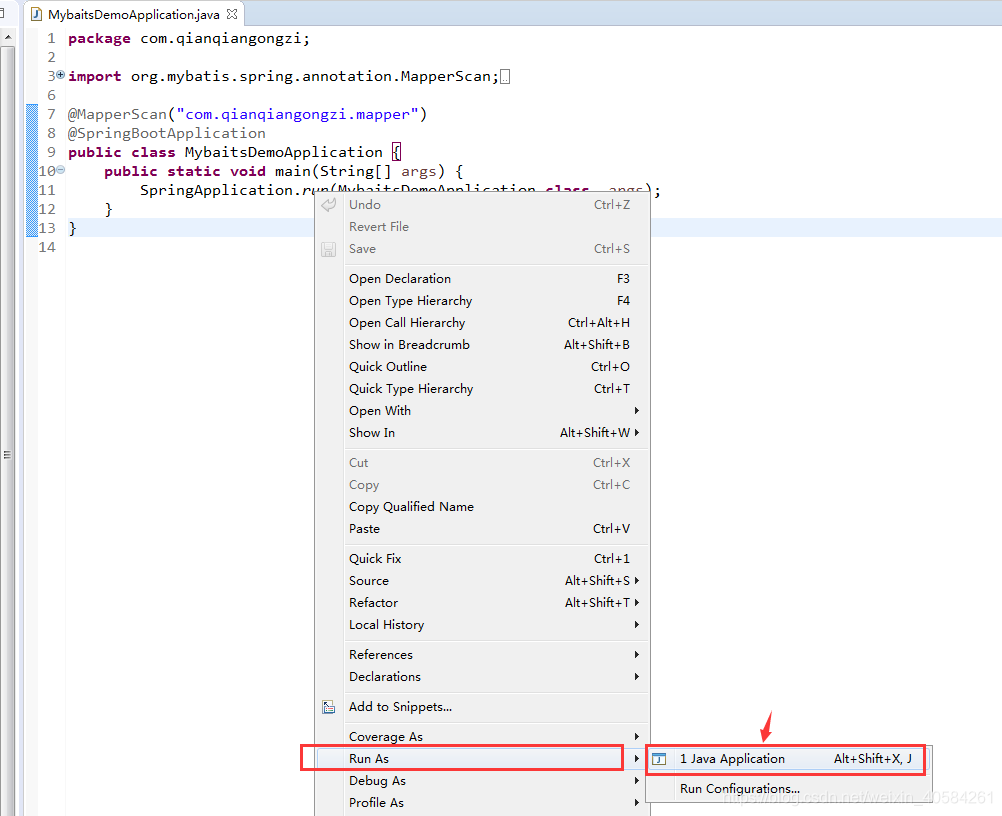
6、增加启动类MybaitsDemoApplication
package com.qianqiangongzi;

import org.mybatis.spring.annotation.MapperScan;
import org.springframework.boot.SpringApplication;
import org.springframework.boot.autoconfigure.SpringBootApplication;

//扫描mapper,也可以在mapper里面的类写@Mapper注解
@MapperScan("com.qianqiangongzi.mapper")
@SpringBootApplication
public class MybaitsDemoApplication {
	public static void main(String[] args) {
		SpringApplication.run(MybaitsDemoApplication.class, args);
	}
}
7、登录mysql数据库,创建数据库、表及插入数据(未安装mysql数据库请自行查询资料)。
创建数据库test
create database test;切换到test,并创建表
create table user(
  id int primary key,
  name varchar(20),
  age int
);
插入两条数据
insert into user values(1,'zhangsan',25);
insert into user values(2,'lisi',26);
查询插入的数据
select * from user;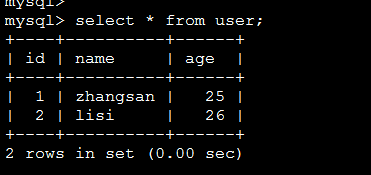
8、通过MybaitsDemoApplication启动项目
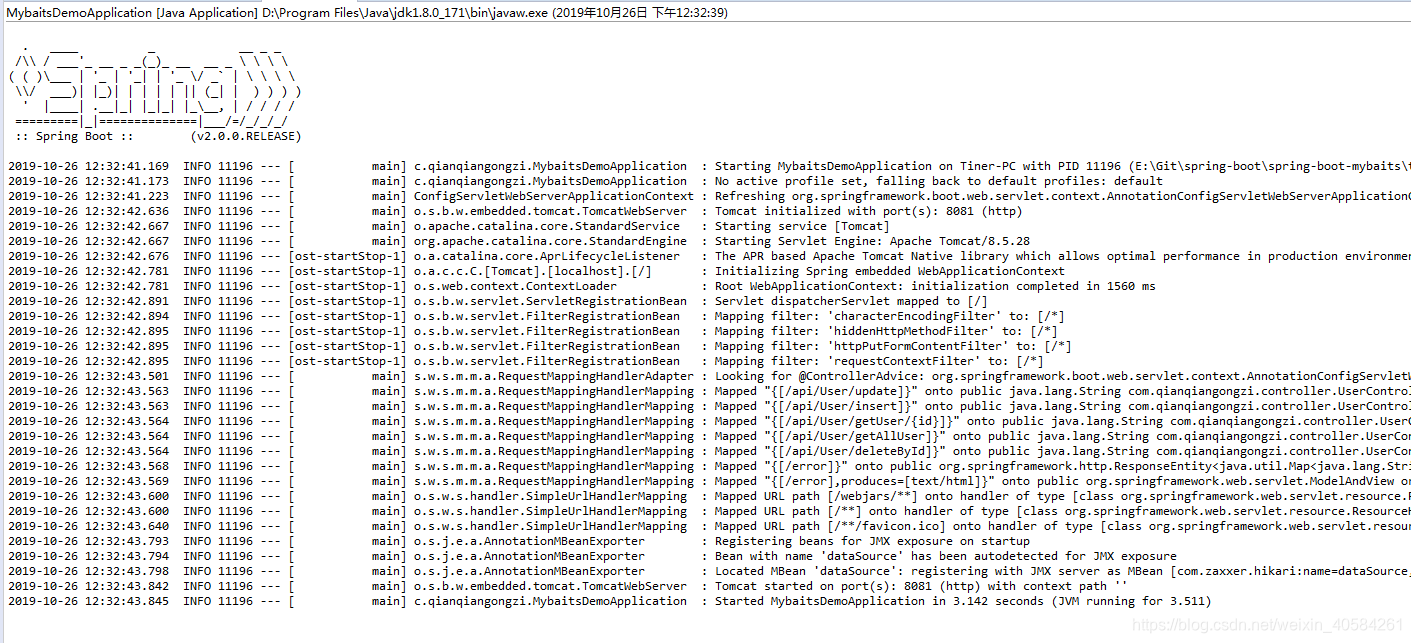
启动正常,没报任何错误。
9、打开浏览器,验证是否正确
通过id查询数据: http://localhost:8081/api/User/getUser/1

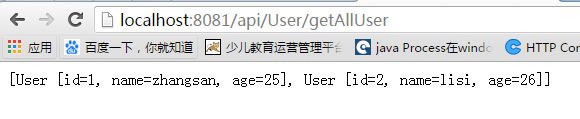
获取所有用户:http://localhost:8081/api/User/getAllUser
插入一条数据:http://localhost:8081/api/User/insert?id=3&name=mawu&age=28
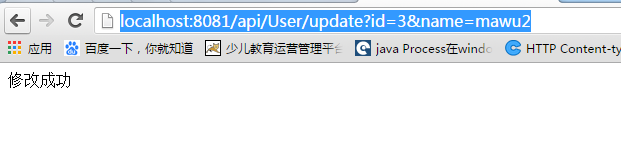
修改刚刚插入的数据:http://localhost:8081/api/User/update?id=3&name=mawu2
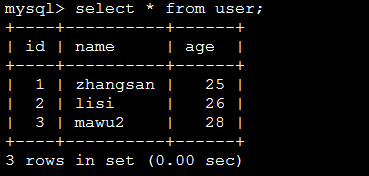
mysql查询记录
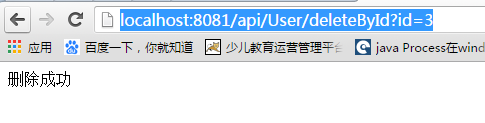
删除刚刚插入的记录:http://localhost:8081/api/User/deleteById?id=3
可能出现的问题:
1、mysql连接不上
检查用户名密码正确后,还是连接不上,可能是IP授权问题,参考MySQL用户IP授权
2、Field userMapper in com.qianqiangongzi.service.UserService required a bean of type 'com.qianqiangongzi.mapper.UserMapper' that could not be found.
没有加@MapperScan注解,在@SpringBootApplication加上@MapperScan("com.qianqiangongzi.mapper")或者在UserMapper加上对应的@Mapper注解也是可以的。
总结:上面的例子简单的演示了基于spring boot的mybaits的过程,更多复杂的操作,还需要进一步去研究。有问题评论讨论。
源码下载地址:spring-boot-mybaits