在Flutter项目开发中有时候有些常用的框架没有Flutter版本,这样的场景就需要接入原生sdk并完成与原生sdk通讯 这里主要讲解如何实现与iOS的混合开发
大致思路就是创建Flutter_module项目,并将Flutter项目以及引用的第三方库编译成静态Framework并在iOS中通过pod的方式引入
第一步:创建一个原生的iOS工程
1.创建一个空文件夹 名字叫 flutter_iOS_Mixture
2.在flutter_iOS_Mixture文件夹中创建XCode工程,并在工程中执行
pod init
pod install
第二步:创建Flutter_Module
1.定位到flutter_iOS_Mixture文件夹目录,并在终端执行命令,创建flutter module
flutter create -t module flutter_project
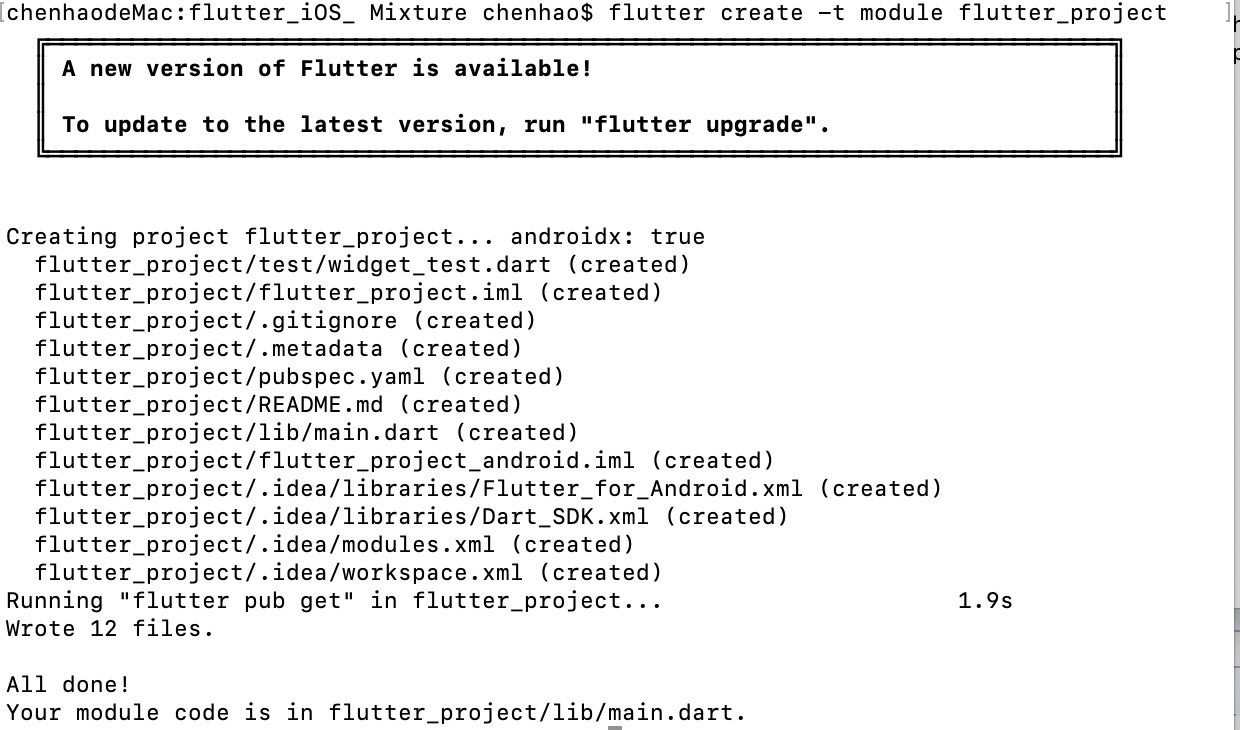
执行完毕后,工程中的目录结构
2.查看目录结构查看隐藏文件请使用快捷键打开隐藏文件
command + shift + .
目录结构
.
├── flutter_project
│   ├── README.md
│   ├── flutter_project.iml
│   ├── flutter_project_android.iml
│   ├── lib
│   ├── pubspec.lock
│   ├── pubspec.yaml
│   └── test
└── iOS_App
    ├── iOS_App
    ├── iOS_App.xcodeproj
    ├── iOS_AppTests
    └── iOS_AppUITests
3.打开Flutter工程,并在pubspec.yaml文件中添加两个第三方框架 执行 pub get
  cupertino_icons: ^0.1.2
  webview_flutter: ^0.3.19+9
  url_launcher: ^5.1.2
第三步:将Flutter编译成静态Framework并引用到iOS工程中
这里就有个分支了两种解决方案 1种是直接在iOS中添加依赖,就可以实现Flutter与iOS的混合,操作简单,但是有个缺点就是如果是多人开发项目的话,直接引入,需要每个开发者都需要有Flutter环境才可以正常编译通过,否则会报错,这样侵入性太强,但是如果开发人数少,使用这种方式确实可以提升开发效率(不能每次修改Flutter内容后都需要重新将Flutter打包成Framework,节约了不少时间),这也是苹果官方推荐使用的解决方案
直接在Podfile文件中加入如果内容,Flutter与iOS的桥接就算完成了
flutter_application_path = '../flutter_project/'
load File.join(flutter_application_path, '.ios', 'Flutter', 'podhelper.rb')
install_all_flutter_pods(flutter_application_path)
全部文件如下:
# Uncomment the next line to define a global platform for your project
# platform :ios, '9.0'
flutter_application_path = '../flutter_project/'

load File.join(flutter_application_path, '.ios', 'Flutter', 'podhelper.rb')

target 'iOS_App' do
  # Comment the next line if you don't want to use dynamic frameworks
  use_frameworks!

  install_all_flutter_pods(flutter_application_path)

  # Pods for iOS_App

  target 'iOS_AppTests' do
    inherit! :search_paths
    # Pods for testing
  end

  target 'iOS_AppUITests' do
    # Pods for testing
  end

end
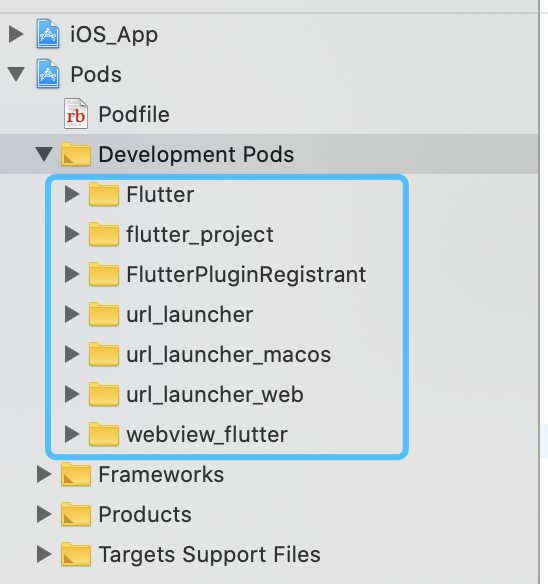
执行pod install将Flutter引入到iOS项目中
chenhaodeMac:iOS_App chenhao$ pod install
Analyzing dependencies
Downloading dependencies
Installing FlutterPluginRegistrant 0.0.1
Installing url_launcher (0.0.1)
Installing url_launcher_macos (0.0.1)
Installing url_launcher_web (0.0.1)
Installing webview_flutter (0.0.1)
Generating Pods project
Integrating client project
Pod installation complete! There are 7 dependencies from the Podfile and 7 total pods installed.
``
查看XCode工程发现导入的Flutter库也被加入到了iOS中
以上是Flutter与iOS桥接的第一种方式
2.将Flutter作为一个组件加入到iOS工程中,这样需要使用的时候,直接通过pod导入就行了,这样的好处是任何人都可以导入该插件,不需要电脑中装有Flutter环境,但是这种方式桥接操作相对繁杂,Flutter项目中内容有修改,需要重新打包并提交iOS工程中才可以生效,下面主要介绍这种方式如何实现与iOS的桥接
1> 创建一个Pod库在flutter_iOS_Mixture根目录执行命令创建pod lib
```
pod lib create flutter_lib
```
```
chenhaodeMac:flutter_iOS_ Mixture chenhao$ pod lib create flutter_lib
Cloning `https://github.com/CocoaPods/pod-template.git` into `flutter_lib`.
Configuring flutter_lib template.
To get you started we need to ask a few questions, this should only take a minute.
If this is your first time we recommend running through with the guide:
- https://guides.cocoapods.org/making/using-pod-lib-create.html
( hold cmd and double click links to open in a browser. )
What platform do you want to use?? [ iOS / macOS ]
> iOS
What language do you want to use?? [ Swift / ObjC ]
> ObjC
Would you like to include a demo application with your library? [ Yes / No ]
> NO
Which testing frameworks will you use? [ Specta / Kiwi / None ]
> None
Would you like to do view based testing? [ Yes / No ]
> No
What is your class prefix?
> ASS
Running pod install on your new library.
Analyzing dependencies
Downloading dependencies
Installing flutter_lib (0.1.0)
Generating Pods project
Integrating client project
[!] Please close any current Xcode sessions and use `flutter_lib.xcworkspace` for this project from now on.
Pod installation complete! There is 1 dependency from the Podfile and 1 total pod installed.
Ace! you're ready to go!
此时的目录结构如下
.
├── flutter_lib
│   ├── Example
│   ├── LICENSE
│   ├── README.md
│   ├── _Pods.xcodeproj -> Example/Pods/Pods.xcodeproj
│   ├── flutter_lib
│   └── flutter_lib.podspec
├── flutter_project
│   ├── README.md
│   ├── flutter_project.iml
│   ├── flutter_project_android.iml
│   ├── lib
│   ├── pubspec.lock
│   ├── pubspec.yaml
│   └── test
└── iOS_App
    ├── Podfile
    ├── Podfile.lock
    ├── Pods
    ├── iOS_App
    ├── iOS_App.xcodeproj
    ├── iOS_App.xcworkspace
    ├── iOS_AppTests
    └── iOS_AppUITests
在flutter_lib中创建ios_frameworks文件夹用来存放Flutter编译后的静态文件
找到flutter_lib中flutter_lib.podspec找打并修改引用 在文件最后添加如下一段代码
  s.ios.deployment_target = '8.0'

  s.static_framework = true
  p = Dir::open("ios_frameworks")
  arr = Array.new
  arr.push('ios_frameworks/*.framework')
  s.ios.vendored_frameworks = arr

  #s.source_files = 'flutter_lib/Classes/**/*'

  # s.resource_bundles = {
  #   'flutter_lib' => ['flutter_lib/Assets/*.png']
  # }

  # s.public_header_files = 'Pod/Classes/**/*.h'
  # s.frameworks = 'UIKit', 'MapKit'
  # s.dependency 'AFNetworking', '~> 2.3'
下面开始执行一段脚本 将Flutter编译并打包,将生成的frameworks自动移入到flutter_lib中的ios_frameworks中,这个ios_frameworks也正好是刚刚修改的flutter_lib.podspec引入的路径,将脚本放在flutter项目根目录中,脚本内容
if [ -z $out ]; then
    out='ios_frameworks'
fi

echo "准备输出所有文件到目录: $out"

echo "清除所有已编译文件"
find . -d -name build | xargs rm -rf
flutter clean
rm -rf $out
rm -rf build

flutter packages get

addFlag(){
    cat .ios/Podfile > tmp1.txt
    echo "use_frameworks!" >> tmp2.txt
    cat tmp1.txt >> tmp2.txt
    cat tmp2.txt > .ios/Podfile
    rm tmp1.txt tmp2.txt
}

echo "检查 .ios/Podfile文件状态"
a=$(cat .ios/Podfile)
if [[ $a == use* ]]; then
    echo '已经添加use_frameworks, 不再添加'
else
    echo '未添加use_frameworks,准备添加'
    addFlag
    echo "添加use_frameworks 完成"
fi

echo "编译flutter"
flutter build ios --debug --no-codesign
#flutter build ios --release --no-codesign

echo "编译flutter完成"
mkdir $out

cp -r build/ios/Debug-iphoneos/*/*.framework $out
#cp -r build/ios/Release-iphoneos/*/*.framework $out
cp -r .ios/Flutter/App.framework $out
cp -r .ios/Flutter/engine/Flutter.framework $out

echo "复制framework库到临时文件夹: $out"

libpath='../flutter_lib/'

rm -rf "$libpath/ios_frameworks"
mkdir $libpath
cp -r $out $libpath

echo "复制库文件到: $libpath"
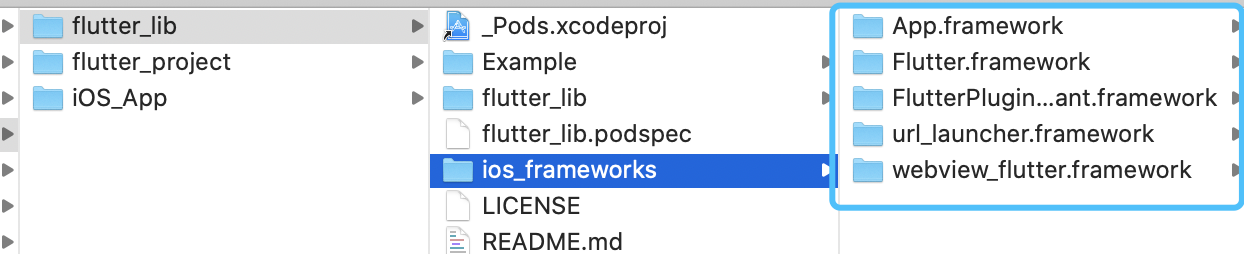
执行脚本后发现flutter_lib中的ios_frameworks中多了一些flutter的使用的库文件
sh build_ios.sh
在podfile文件中引入组件化的flutter库
pod 'flutter_lib', :path => '../flutter_lib'
执行pod install
chenhaodeMac:iOS_App chenhao$ pod install
Analyzing dependencies
Downloading dependencies
Installing flutter_lib (0.1.0)
Generating Pods project
Integrating client project
Pod installation complete! There is 1 dependency from the Podfile and 1 total pod installed.
此时Flutter与iOS的第二种桥接方式算是操作完了,此时flutter_lib已经通过pod引入到了项目中

第四步:iOS与Flutter互相通讯