消息队列 - Spring boot 中RabbitMQ的使用
一丶AMQP
AMQP,即Advanced Message Queuing Protocol,一个提供统一消息服务的应用层标准高级消息队列协议,是应用层协议的一个开放标准,为面向消息的中间件设计。基于此协议的客户端与消息中间件可传递消息,并不受客户端/中间件不同产品,不同的开发语言等条件的限制。Erlang中的实现有RabbitMQ等
简单来说,AMQP就是为解决不同开发语言,不同消息队列产品的限制而提出的高级消息队列协议(JMS只能在java语言中使用),而 RabbitMQ是AMQP的一种实现。
AMQP模型
我们需要明确的定义服务器的语义,因为所有服务器实现都应该保持这些语义的一致性,否则就无法进行互操作。
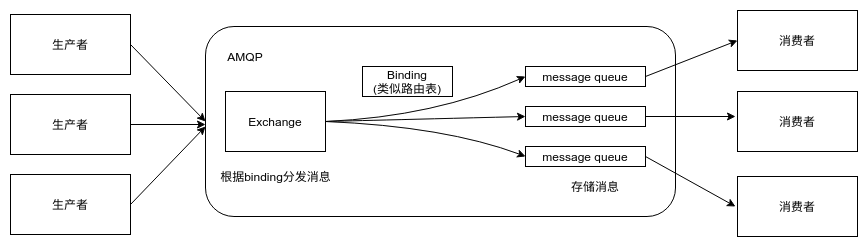
因此AMQP模型描述了一套模块化的组件以及这些组件之间进行连接的标准规则。在服务器中,三个主要功能模块连接成一个处理链完成预期的功能:“exchange”接收发布应用程序发送的消息,并根据一定的规则将这些消息路由到“消息队列”。“message queue”存储消息,直到这些消息被消费者安全处理完为止。“binding”定义了exchange和message queue之间的关联,提供路由规则。使用这个模型我们可以很容易的模拟出存储转发队列和主题订阅这些典型的消息中间件概念。一个AMQP服务器类似于邮件服务器,exchange类似于消息传输代理(email里的概念),message queue类似于邮箱。Binding定义了每一个传输代理中的消息路由表,发布者将消息发给特定的传输代理,然后传输代理将这些消息路由到邮箱中,消费者从这些邮箱中取出消息
二丶spring boot 中的关键配置
pom.xml
 <dependency>
      <groupId>org.springframework.boot</groupId>
      <artifactId>spring-boot-starter-amqp</artifactId>
 </dependency>
properties
spring.rabbitmq.host=localhost
spring.rabbitmq.port=5672
spring.rabbitmq.username=root
spring.rabbitmq.password=root
spring.rabbitmq.virtual-host=/
三丶工作队列
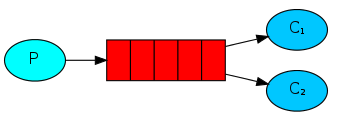
当做任务队列使用,供多个消费者消费 (发送到每个消费者的消息都不一样)。
该使用方式配置最简单,无须配置exchange,无须配置binding, 使用默认的exchange(""), 将队列名字当做route_key, 表示直接发送到该队列。
1)配置
   //这里配置的remplate, 使用默认的也可以
     @Bean("defaultRabbitTemplate")
    public RabbitTemplate defaultRabbitTemplate(ConnectionFactory connectionFactory){
        RabbitTemplate rabbitTemplate=new RabbitTemplate(connectionFactory);
        return rabbitTemplate;
    }
 // ===================================
    // https://www.rabbitmq.com/tutorials/tutorial-two-java.html
    // 1. 工作队列 -- 用作缓冲队列,  mq推送一条消息到一个消费端, 多个消费端可以并行执行不同消息
    // Manual message acknowledgments are turned on by default
    // 正常处理完一条消息后, 发送ack给mq, mq可以"自由"删除该消息,
    // 如果没有收到ack, mq会认为对应消费端出问题了, 然后发送该消息给其他正常的消费端

    //使用默认的exchange(""), routing_key为队列名

    public static final String WORK_QUEUE_NAME ="work.queue";

    // 由RabbitAdmin收集队列信息, 并注入Connection监听器
    // 创建connection后, 会声明(创建)队列
    @Bean
    public Queue workQueue(){
        Queue queue=new Queue(WORK_QUEUE_NAME, true, false, false);
        return queue;
    }
2)生产者(这里是在junit中使用)
 @Test
    public void sendToWorkQueue() throws InterruptedException {
        //使用默认的交换机"", 直接发送到指定queue,供给多个消费者使用,每个消费者都是收到不同的消息
        defaultRabbitTemplate.convertAndSend(RabbitMqConfig.WORK_QUEUE_NAME,
                "aa message from work.queue.RabbitTemplate");

        defaultRabbitTemplate.convertAndSend(RabbitMqConfig.WORK_QUEUE_NAME,
                "bb message from work.queue.RabbitTemplate");


        TimeUnit.SECONDS.sleep(2);//等待消费者消费
    }
3)消费者
a. 消费者1
@Slf4j
@Component
public class WorkQueueMessageListener1 implements MessageListener {

    @RabbitListener(queues = RabbitMqConfig.WORK_QUEUE_NAME)
    @Override
    public void onMessage(Message message) {
        byte[] body=message.getBody();
        String msgStr=new String(body);
        log.info("work.queue.consumer1 收到一条消息: "+msgStr);
    }

}
b. 消费者2
@Slf4j
@Component
public class WorkQueueMessageListener2 implements MessageListener {

    @RabbitListener(queues = RabbitMqConfig.WORK_QUEUE_NAME)
    @Override
    public void onMessage(Message message) {
        byte[] body=message.getBody();
        String msgStr=new String(body);
        log.info("work.queue.consumer2 收到一条消息: "+msgStr);
    }

}
4) 输出结果

三丶发布订阅
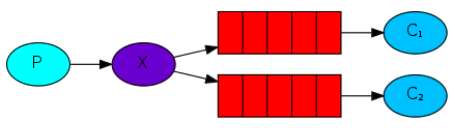
生产者发送一份消息给rabbitmq, rabbitmq将该消息都发送给多个订阅队列,供多个消费者消费相同的消息,注意,这里的route_key为""。
1)配置
// ===================================
    // https://www.rabbitmq.com/tutorials/tutorial-three-java.html
    // 2. 发布-订阅 发送一样的消息到多个队列
    public static final String PUBLISH_SUBSCRIBE_LOGS_EXCHANGE_NAME="publish.subscribe.logs.exchange";
    public static final String PUBLISH_SUBSCRIBE_LOGS_QUEUE_NAME_1="publish.subscribe.logs.queue.1";
    public static final String PUBLISH_SUBSCRIBE_LOGS_QUEUE_NAME_2="publish.subscribe.logs.queue.2";
    public static final String PUBLISH_SUBSCRIBE_LOGS_ROUTING_KEY=""; //路由key为空

    @Bean
    public Exchange logsExchange(){
        // 类型为fanout 无脑广播 (Sending messages to many consumers at once)
        Exchange exchange=new FanoutExchange(PUBLISH_SUBSCRIBE_LOGS_EXCHANGE_NAME);
        return exchange;
    }

    @Bean
    public Queue logsQueue1(){
        Queue queue=new Queue(PUBLISH_SUBSCRIBE_LOGS_QUEUE_NAME_1);
        return  queue;
    }

    @Bean
    public Binding logsBinding1(){
        Binding binding=new Binding(
                PUBLISH_SUBSCRIBE_LOGS_QUEUE_NAME_1,
                Binding.DestinationType.QUEUE,
                PUBLISH_SUBSCRIBE_LOGS_EXCHANGE_NAME,
                PUBLISH_SUBSCRIBE_LOGS_ROUTING_KEY,
                null);
        return binding;
    }

    @Bean
    public Queue logsQueue2(){
        Queue queue=new Queue(PUBLISH_SUBSCRIBE_LOGS_QUEUE_NAME_2);
        return queue;
    }

    @Bean
    public Binding logsBinding2(){
        Binding binding=new Binding(PUBLISH_SUBSCRIBE_LOGS_QUEUE_NAME_2,
                Binding.DestinationType.QUEUE,PUBLISH_SUBSCRIBE_LOGS_EXCHANGE_NAME,
                PUBLISH_SUBSCRIBE_LOGS_ROUTING_KEY,
                null);
        return binding;
    }
2)生产者
    //发布订阅,即发送一样的消息到多个消费者, route_key为""
    @Test
    public void sendToLogsQueue() throws InterruptedException {
        defaultRabbitTemplate.convertAndSend(RabbitMqConfig.PUBLISH_SUBSCRIBE_LOGS_EXCHANGE_NAME,
                    RabbitMqConfig.PUBLISH_SUBSCRIBE_LOGS_ROUTING_KEY,
                "test message from publish.logs.queue.RabbitTemplate");

        TimeUnit.SECONDS.sleep(2);//等待消费者消费
    }
3)消费者
a. 消费者1
@Slf4j
@Component
public class LogsQueueMessageListener1 implements MessageListener {

    //exclusive=true, 标明只能有一个消费者获取该队列的数据
    @RabbitListener(queues = RabbitMqConfig.PUBLISH_SUBSCRIBE_LOGS_QUEUE_NAME_1, exclusive = true)
    @Override
    public void onMessage(Message message) {
        byte[] body=message.getBody();
        String msgStr=new String(body);
        log.info("logs.consumer.1 收到一条消息: "+msgStr);
    }

}
b.消费者2
@Slf4j
@Component
public class LogsQueueMessageListener2 implements MessageListener {

    //exclusive=true, 标明只能有一个消费者获取该队列的数据
    @RabbitListener(queues = RabbitMqConfig.PUBLISH_SUBSCRIBE_LOGS_QUEUE_NAME_2, exclusive = true)
    @Override
    public void onMessage(Message message) {
        byte[] body=message.getBody();
        String msgStr=new String(body);
        log.info("logs.consumer.2 收到一条消息: "+msgStr);
    }

}
4)输出结果

四丶路由
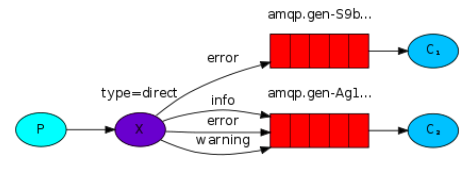
根据binding配置(类似路由表),以及route_key, 路由消息到指定queue. 如下图所示,当route_key为error时,将会发送到两个队列,当route_key为info和warning时,发送到第二个队列。
1) 配置
// ===================================
    // https://www.rabbitmq.com/tutorials/tutorial-four-java.html
    // 3. 路由 根据完全匹配routing_key发送消息到指定queue
    public static final String ROUTE_COLOR_EXCHANGE_NAME="route.color.exchange";

    public static final String ROUTE_COLOR_BLUE_QUEUE_NAME="route.color.blue.queue";
    public static final String ROUTE_COLOR_BLUE_ROUTING_KEY="blue";

    public static final String ROUTE_COLOR_BLACK_QUEUE_NAME_1="route.color.black.queue.1";
    public static final String ROUTE_COLOR_BLACK_QUEUE_NAME_2="route.color.black.queue.2";
    public static final String ROUTE_COLOR_BLACK_ROUTING_KEY="black";


    @Bean
    public Exchange colorExchange(){
        // 类型为direct 根据完全匹配routing_key发送消息到指定queue (Receiving messages selectively)
        Exchange exchange=new DirectExchange(ROUTE_COLOR_EXCHANGE_NAME);
        return exchange;
    }

    @Bean
    public Queue blueQueue(){
        Queue queue=new Queue(ROUTE_COLOR_BLUE_QUEUE_NAME);
        return  queue;
    }

    //构建binding, 将route_key和对应queue绑定在一次,类似构建路由表,使得exchange能够根据route_key分发消息到对应队列里
    @Bean
    public Binding blueBinding(){
        Binding binding=new Binding(
                ROUTE_COLOR_BLUE_QUEUE_NAME,
                Binding.DestinationType.QUEUE,
                ROUTE_COLOR_EXCHANGE_NAME,
                ROUTE_COLOR_BLUE_ROUTING_KEY,
                null);
        return binding;
    }

    @Bean
    public Queue blackQueue1(){
        Queue queue=new Queue(ROUTE_COLOR_BLACK_QUEUE_NAME_1);
        return  queue;
    }

    @Bean
    public Binding blackBinding1(){
        Binding binding=new Binding(
                ROUTE_COLOR_BLACK_QUEUE_NAME_1,
                Binding.DestinationType.QUEUE,
                ROUTE_COLOR_EXCHANGE_NAME,
                ROUTE_COLOR_BLACK_ROUTING_KEY,
                null);
        return binding;
    }

    @Bean
    public Queue blackQueue2(){
        Queue queue=new Queue(ROUTE_COLOR_BLACK_QUEUE_NAME_2);
        return  queue;
    }

    @Bean
    public Binding blackBinding2(){
        Binding binding=new Binding(
                ROUTE_COLOR_BLACK_QUEUE_NAME_2,
                Binding.DestinationType.QUEUE,
                ROUTE_COLOR_EXCHANGE_NAME,
                ROUTE_COLOR_BLACK_ROUTING_KEY,
                null);
        return binding;
    }
2)生产者
    @Test
    public void sendToColorQueue() throws InterruptedException {
        // 根据route_key, 发送到指定queue

        // route - blue
        defaultRabbitTemplate.convertAndSend(RabbitMqConfig.ROUTE_COLOR_EXCHANGE_NAME,
                RabbitMqConfig.ROUTE_COLOR_BLUE_ROUTING_KEY,
                "blue message from route.color.queue.RabbitTemplate");


        // route - black
        defaultRabbitTemplate.convertAndSend(RabbitMqConfig.ROUTE_COLOR_EXCHANGE_NAME,
                RabbitMqConfig.ROUTE_COLOR_BLACK_ROUTING_KEY,
                "black message from route.color.queue.RabbitTemplate");

        TimeUnit.SECONDS.sleep(2);//等待消费者消费
    }
3)消费者
a.消费者1
@Slf4j
@Component
public class ColorBlackQueueMessageListener1 implements MessageListener {

    @RabbitListener(queues = RabbitMqConfig.ROUTE_COLOR_BLACK_QUEUE_NAME_1)
    @Override
    public void onMessage(Message message) {
        byte[] body=message.getBody();
        String msgStr=new String(body);
        log.info("color.black.consumer.1 收到一条消息: "+msgStr);
    }

}
b.消费者2
@Slf4j
@Component
public class ColorBlackQueueMessageListener2 implements MessageListener {

    @RabbitListener(queues = RabbitMqConfig.ROUTE_COLOR_BLACK_QUEUE_NAME_2)
    @Override
    public void onMessage(Message message) {
        byte[] body=message.getBody();
        String msgStr=new String(body);
        log.info("color.black.consumer.2 收到一条消息: "+msgStr);
    }

}
c.消费者3
@Slf4j
@Component
public class ColorBlueQueueMessageListener implements MessageListener {

    @RabbitListener(queues = RabbitMqConfig.ROUTE_COLOR_BLUE_QUEUE_NAME)
    @Override
    public void onMessage(Message message) {
        byte[] body=message.getBody();
        String msgStr=new String(body);
        log.info("color.blue.consumer 收到一条消息: "+msgStr);
    }

}
4.输出结果

五丶主题
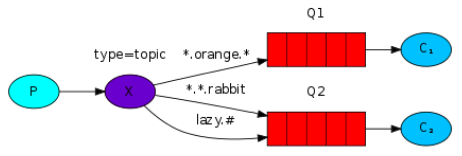
exchange类型为topic,binding中配置的含通配符的route_key, 当exchange收到具体的route_key以及对应的消息时,如果具体的route_key匹配binding中的通配符key, exchange会发送消息到对应的queue. "*"匹配一个单词,"#"匹配零个或者多个单词。如下图,生产者指定route_key="lazy.orange.log",发送消息到mq后,exchange将会发送消息到Q1 Q2, 如果route_key="a.b.rabbit", 则消息会被发送到Q2
1)配置
// ===================================
    // https://www.rabbitmq.com/tutorials/tutorial-five-java.html
    // 4. 匹配符模糊匹配 可以根据匹配符模糊匹配routing_key, 发送到对应的queue

    public static final String TOPIC_LOGS_EXCHANGE_NAME="topic.logs.exchange";

    // routing_key 以"."分隔, "."之间的所有字母为一个单词
    // "#"可以匹配0个或多个单词
    // "*"仅匹配一个单词
    public static final String TOPIC_LOGS_WHOLE_QUEUE_NAME="topic.logs.whole.queue";
    public static final String TOPIC_LOGS_WHOLE_ROUTING_KEY="#";

    public static final String TOPIC_LOGS_KERN_ALL_QUEUE_NAME="topic.logs.kern.all.queue";
    public static final String TOPIC_LOGS_KERN_ALL_ROUTING_KEY="kern.*";

    public static final String TOPIC_LOGS_ALL_CRITICAL_QUEUE_NAME="topic.logs.all.critical.queue";
    public static final String TOPIC_LOGS_ALL_CRITICAL_ROUTING_KEY="*.critical";

    public static final String TOPIC_LOGS_KERN_CRITICAL_QUEUE_NAME="topic.logs.kern.critical.queue";
    public static final String TOPIC_LOGS_KERN_CRITICAL_ROUTING_KEY="kern.critical";

    @Bean
    public Exchange topicLogsExchange(){
        // 类型为topic 可以根据匹配符模糊匹配routing_key, 发送到对应的queue
        Exchange exchange=new TopicExchange(TOPIC_LOGS_EXCHANGE_NAME);
        return exchange;
    }

    @Bean
    public Queue wholeQueue(){
        Queue queue=new Queue(TOPIC_LOGS_WHOLE_QUEUE_NAME);
        return  queue;
    }

    @Bean
    public Binding wholeBinding(){
        Binding binding=new Binding(
                TOPIC_LOGS_WHOLE_QUEUE_NAME,
                Binding.DestinationType.QUEUE,
                TOPIC_LOGS_EXCHANGE_NAME,
                TOPIC_LOGS_WHOLE_ROUTING_KEY,
                null);
        return binding;
    }

    @Bean
    public Queue kernAllQueue(){
        Queue queue=new Queue(TOPIC_LOGS_KERN_ALL_QUEUE_NAME);
        return  queue;
    }

    @Bean
    public Binding kernAllBinding(){
        Binding binding=new Binding(
                TOPIC_LOGS_KERN_ALL_QUEUE_NAME,
                Binding.DestinationType.QUEUE,
                TOPIC_LOGS_EXCHANGE_NAME,
                TOPIC_LOGS_KERN_ALL_ROUTING_KEY,
                null);
        return binding;
    }

    @Bean
    public Queue allCriticalQueue(){
        Queue queue=new Queue(TOPIC_LOGS_ALL_CRITICAL_QUEUE_NAME);
        return  queue;
    }

    @Bean
    public Binding allCriticalBinding(){
        Binding binding=new Binding(
                TOPIC_LOGS_ALL_CRITICAL_QUEUE_NAME,
                Binding.DestinationType.QUEUE,
                TOPIC_LOGS_EXCHANGE_NAME,
                TOPIC_LOGS_ALL_CRITICAL_ROUTING_KEY,
                null);
        return binding;
    }

    @Bean
    public Queue kernCriticalQueue(){
        Queue queue=new Queue(TOPIC_LOGS_KERN_CRITICAL_QUEUE_NAME);
        return  queue;
    }

    @Bean
    public Binding kernCriticalBinding(){
        Binding binding=new Binding(
                TOPIC_LOGS_KERN_CRITICAL_QUEUE_NAME,
                Binding.DestinationType.QUEUE,
                TOPIC_LOGS_EXCHANGE_NAME,
                TOPIC_LOGS_KERN_CRITICAL_ROUTING_KEY,
                null);
        return binding;
    }
2)生产者
   @Test
    public void sendToTopicLogsQueue() throws InterruptedException {
        //指定多种具体route_key发送, 交换机会根据binding的key模糊匹配具体的key, 发送信息到匹配的queue

        // topic - kern.critical
        defaultRabbitTemplate.convertAndSend(RabbitMqConfig.TOPIC_LOGS_EXCHANGE_NAME,
                RabbitMqConfig.TOPIC_LOGS_KERN_CRITICAL_ROUTING_KEY,
                "kern.critical message from topic.logs.exchange.RabbitTemplate");


        // topic - other
        defaultRabbitTemplate.convertAndSend(RabbitMqConfig.TOPIC_LOGS_EXCHANGE_NAME,
                "other",
                "other message from topic.logs.exchange.RabbitTemplate");

        TimeUnit.SECONDS.sleep(2);//等待消费者消费
    }
3)消费者
a.消费者1
@Slf4j
@Component
public class AllCriticalQueueMessageListener implements MessageListener {

    @RabbitListener(queues = RabbitMqConfig.TOPIC_LOGS_ALL_CRITICAL_QUEUE_NAME)
    @Override
    public void onMessage(Message message) {
        byte[] body=message.getBody();
        String msgStr=new String(body);
        log.info("topic.all.critical.queue.consumer 收到一条消息: "+msgStr);
    }
}
b.消费者2
@Slf4j
@Component
public class KernAllQueueMessageListener implements MessageListener {

    @RabbitListener(queues = RabbitMqConfig.TOPIC_LOGS_KERN_ALL_QUEUE_NAME)
    @Override
    public void onMessage(Message message) {
        byte[] body=message.getBody();
        String msgStr=new String(body);
        log.info("topic.kern.all.queue.consumer 收到一条消息: "+msgStr);
    }
}
c.消费者3


@Slf4j
@Component
public class KernCriticalQueueMessageListener implements MessageListener {

    @RabbitListener(queues = RabbitMqConfig.TOPIC_LOGS_KERN_CRITICAL_QUEUE_NAME)
    @Override
    public void onMessage(Message message) {
        byte[] body=message.getBody();
        String msgStr=new String(body);
        log.info("topic.kern.critical.queue.consumer 收到一条消息: "+msgStr);
    }
}
d.消费者4
@Slf4j
@Component
public class WholeQueueMessageListener implements MessageListener {

    @RabbitListener(queues = RabbitMqConfig.TOPIC_LOGS_WHOLE_QUEUE_NAME)
    @Override
    public void onMessage(Message message) {
        byte[] body=message.getBody();
        String msgStr=new String(body);
        log.info("topic.whole.queue.consumer 收到一条消息: "+msgStr);
    }
}
4.输出结果

学习资料