承接上一篇文章所做工作,这篇文章进一步讲述如何将YOLO封装成动态链接库以方便后续目标检测时直接调用。
关于动态链接库的介绍:
https://www.cnblogs.com/chechen/p/8676226.html
https://www.jianshu.com/p/458f87251b3d?tdsourcetag=s_pctim_aiomsg
step1 运行环境和前期准备
与上一篇文章所需环境完全一致,具体可参考:
https://blog.csdn.net/stjuliet/article/details/87731998
step2 编译动态链接库
1、下载Darknet源代码:
https://github.com/AlexeyAB/darknet
2、
(1)下载解压后,进入darknet-master->build->darknet目录:

(2)打开yolo_cpp_dll.vcxproj文件,将具有CUDA的版本改成自己使用的版本(默认为10.0),一共有两处,分别在55行和302行:


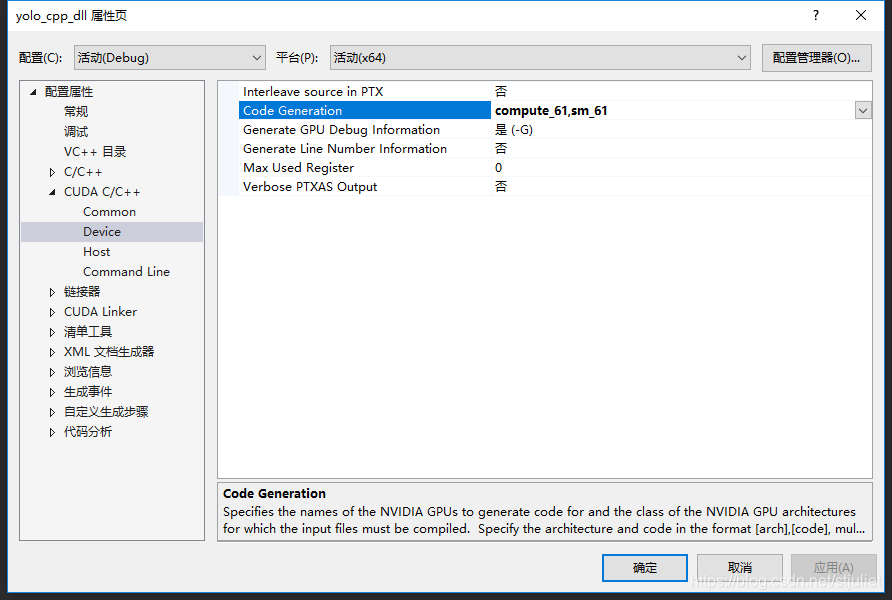
(3)打开yolo_cpp_dll.sln文件,在属性管理器中配置包含目录、库目录、附加依赖项(和OpenCV环境配置一样),特别注意要将CUDA设备中的Generation改成自己显卡对应的计算能力(默认添加了35和75两项,可能不是你的显卡的计算能力,可以去英伟达显卡官网查询计算能力:https://developer.nvidia.com/cuda-gpus#collapseOne)
,否则接下来的生成会出错。
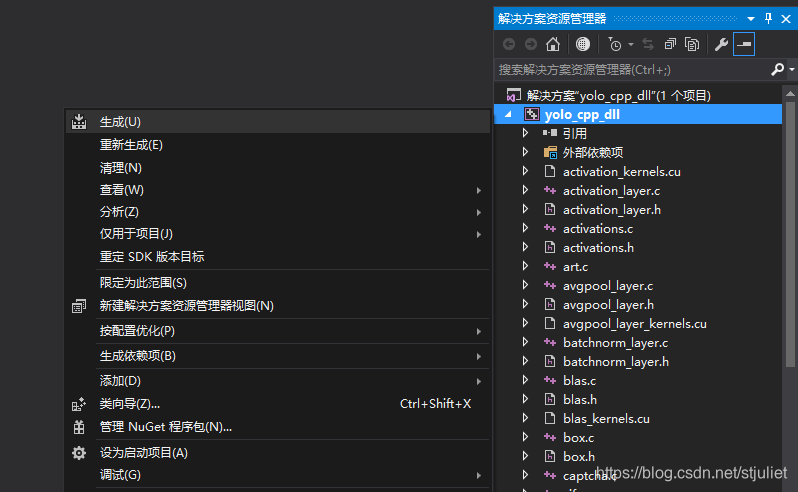
(4)分别设置Debug/Release - x64,右键项目->生成,成功后在darknet-master\build\darknet\x64目录下找到生成的yolo_cpp_dll.lib和yolo_cpp_dll.dll两个文件。
step3 调用动态链接库
一、至此所有准备工作已经完成,首先将调用所需的所有文件找出来:
1、动态链接库(均在darknet-master\build\darknet\x64目录下)
(1)yolo_cpp_dll.lib
(2)yolo_cpp_dll.dll
(3)pthreadGC2.dll
(4)pthreadVC2.dll
2、OpenCV库(取决于使用debug还是release模式)
(1)opencv_world340d.dll
(2)opencv_world340.dll
3、YOLO模型文件(第一个文件在darknet-master\build\darknet\x64\data目录下,第二个文件在darknet-master\build\darknet\x64目录下,第三个文件需要自己下载,下载链接见前一篇文章)
(1)coco.names
(2)yolov3.cfg
(3)yolov3.weights
4、头文件
(1)yolo_v2_class.hpp
头文件包含了动态链接库中具体的类的定义,调用时需要引用,这个文件在darknet-master\build\darknet目录下的yolo_console_dll.sln中,将其复制到记事本保存成.hpp文件即可。
二、在VS2015中新建一个空项目,在源文件中添加main.cpp,将第一步中所有文件全部放入与main.cpp同路径的文件夹中,并且放入一个目标检测的测试视频test0.mp4,在main.cpp中添加如下代码:
#include <iostream>

#ifdef _WIN32
#define OPENCV
#define GPU
#endif

#include "yolo_v2_class.hpp" //引用动态链接库中的头文件
#include <opencv2/opencv.hpp>
#include "opencv2/highgui/highgui.hpp"

#pragma comment(lib, "opencv_world340d.lib") //引入OpenCV链接库
#pragma comment(lib, "yolo_cpp_dll.lib") //引入YOLO动态链接库

//以下两段代码来自yolo_console_dll.sln
void draw_boxes(cv::Mat mat_img, std::vector<bbox_t> result_vec, std::vector<std::string> obj_names,
    int current_det_fps = -1, int current_cap_fps = -1)
{
    int const colors[6][3] = { { 1,0,1 },{ 0,0,1 },{ 0,1,1 },{ 0,1,0 },{ 1,1,0 },{ 1,0,0 } };

    for (auto &i : result_vec) {
        cv::Scalar color = obj_id_to_color(i.obj_id);
        cv::rectangle(mat_img, cv::Rect(i.x, i.y, i.w, i.h), color, 2);
        if (obj_names.size() > i.obj_id) {
            std::string obj_name = obj_names[i.obj_id];
            if (i.track_id > 0) obj_name += " - " + std::to_string(i.track_id);
            cv::Size const text_size = getTextSize(obj_name, cv::FONT_HERSHEY_COMPLEX_SMALL, 1.2, 2, 0);
            int const max_width = (text_size.width > i.w + 2) ? text_size.width : (i.w + 2);
            cv::rectangle(mat_img, cv::Point2f(std::max((int)i.x - 1, 0), std::max((int)i.y - 30, 0)),
                cv::Point2f(std::min((int)i.x + max_width, mat_img.cols-1), std::min((int)i.y, mat_img.rows-1)),
                color, CV_FILLED, 8, 0);
            putText(mat_img, obj_name, cv::Point2f(i.x, i.y - 10), cv::FONT_HERSHEY_COMPLEX_SMALL, 1.2, cv::Scalar(0, 0, 0), 2);
        }
    }
    if (current_det_fps >= 0 && current_cap_fps >= 0) {
        std::string fps_str = "FPS detection: " + std::to_string(current_det_fps) + "   FPS capture: " + std::to_string(current_cap_fps);
        putText(mat_img, fps_str, cv::Point2f(10, 20), cv::FONT_HERSHEY_COMPLEX_SMALL, 1.2, cv::Scalar(50, 255, 0), 2);
    }
}

std::vector<std::string> objects_names_from_file(std::string const filename) {
    std::ifstream file(filename);
    std::vector<std::string> file_lines;
    if (!file.is_open()) return file_lines;
    for(std::string line; getline(file, line);) file_lines.push_back(line);
    std::cout << "object names loaded \n";
    return file_lines;
}

int main()
{
	std::string names_file = "coco.names";
	std::string cfg_file = "yolov3.cfg";
	std::string weights_file = "yolov3.weights";
	Detector detector(cfg_file, weights_file, 0); //初始化检测器
	//std::vector<std::string> obj_names = objects_names_from_file(names_file); //调用获得分类对象名称
	//或者使用以下四行代码也可实现读入分类对象文件
	std::vector<std::string> obj_names;
	std::ifstream ifs(names_file.c_str());
	std::string line;
	while (getline(ifs, line)) obj_names.push_back(line);
	//测试是否成功读入分类对象文件
	for (size_t i = 0; i < obj_names.size(); i++)
	{
		std::cout << obj_names[i] << std::endl;
	}

	cv::VideoCapture capture;
	capture.open("test.avi");
	if (!capture.isOpened())
	{
		printf("文件打开失败");
	}
	cv::Mat frame;
	while (true)
	{
		capture >> frame;
		std::vector<bbox_t> result_vec = detector.detect(frame);
		draw_boxes(frame, result_vec, obj_names);
		cv::namedWindow("test", CV_WINDOW_NORMAL);
		cv::imshow("test", frame);
		cv::waitKey(3);
	}
	return 0;
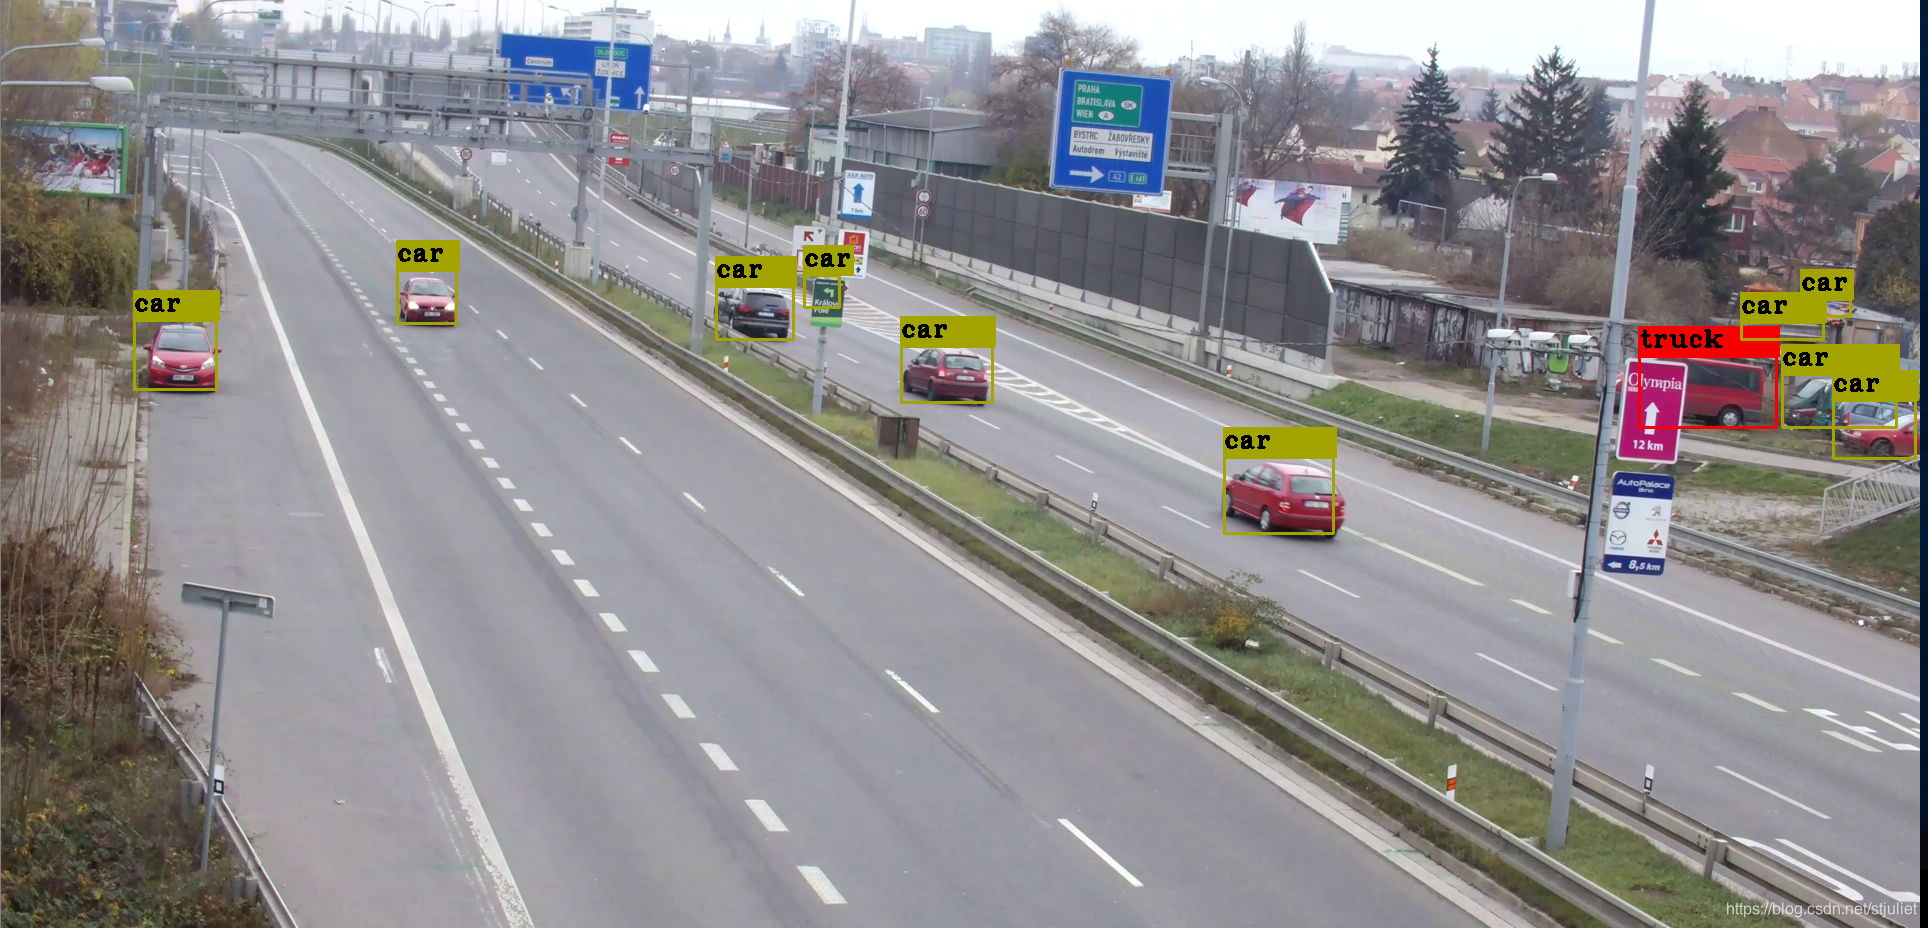
测试效果(视频资源来自于BrnoCompSpeed数据集):
参考资料:
https://blog.csdn.net/qjpxAAA/article/details/52732674
https://blog.csdn.net/weixinhum/article/details/81475548
Juliet 于 2019.2